2025 · DIY · Halloween

DIY Dollar Tree Halloween Haunted House

πŸ‘»πŸŽƒπŸ•ΈπŸ‘»πŸŽƒπŸ•ΈπŸ‘»πŸŽƒπŸ•ΈπŸ‘»πŸŽƒπŸ•ΈπŸ‘»πŸŽƒπŸ•ΈπŸ‘»πŸŽƒπŸ•ΈπŸ‘»πŸŽƒπŸ•ΈπŸ‘»πŸŽƒπŸ•ΈπŸ‘»πŸŽƒπŸ•ΈπŸ‘»πŸŽƒπŸ•ΈπŸ‘»πŸŽƒπŸ•ΈπŸ‘»πŸŽƒπŸ•Έ

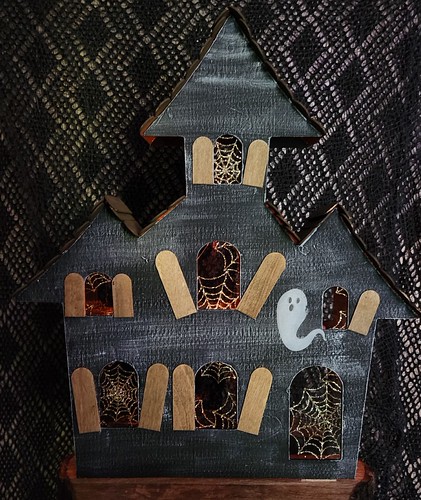
I kept the haunted house simple. I used two wooden cutouts, Jenga blocks as spacers, popsicles as shingles and window shutters, a large ribbon for the windows, a rub-on sticker ghost, orange fairy lights, paints, and hot glue.

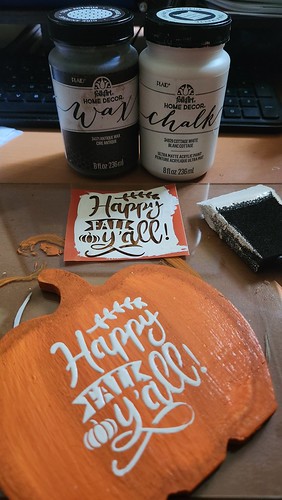
First, I painted the wooden cutouts and Jenga blocks with black chalk paint and let them dry. Meanwhile, I painted the popsicles for the shingles with a mixture of chestnut brown and black chalk paint. The popsicles for the shutters, I stained with anti-wax. When the cutouts were dry, I lightly brushed the one I wanted to use as the front with white chalk paint and let it dry again.

Next, cut out a big spider web ribbon in rectangles and glued them on the backside to cover up the front windows. I added the shutters in different directions to make them look like they are ready to fall off. I rubbed my little β€œBoo” ghost close to one window. Once the front was done. I glued the front and back sides together with spacers. I also added extra spacers to rest my battery box for easy access to them. Then I glued the shingles on the roof.

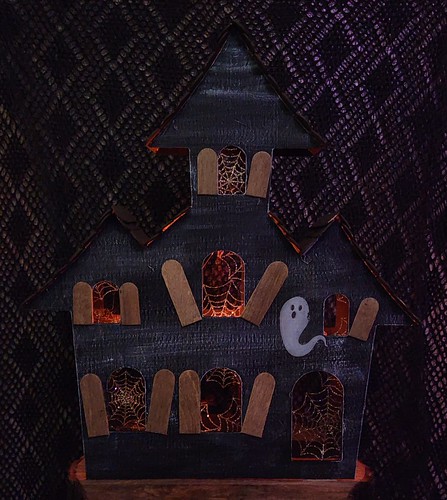
Last but not least, I wrapped the fairy lights around the Jenga block spacers. Now, we also have a big haunted house as a shelf or mantel sitter.

πŸ‘»πŸŽƒπŸ•ΈπŸ‘»πŸŽƒπŸ•ΈπŸ‘»πŸŽƒπŸ•ΈπŸ‘»πŸŽƒπŸ•ΈπŸ‘»πŸŽƒπŸ•ΈπŸ‘»πŸŽƒπŸ•ΈπŸ‘»πŸŽƒπŸ•ΈπŸ‘»πŸŽƒπŸ•ΈπŸ‘»πŸŽƒπŸ•ΈπŸ‘»πŸŽƒπŸ•ΈπŸ‘»πŸŽƒπŸ•ΈπŸ‘»πŸŽƒπŸ•Έ

2025 · DIY · Halloween

DIY Dollar Tree Vintage Halloween Box

πŸ‘»πŸŽƒπŸ•ΈπŸ‘»πŸŽƒπŸ•ΈπŸ‘»πŸŽƒπŸ•ΈπŸ‘»πŸŽƒπŸ•ΈπŸ‘»πŸŽƒπŸ•ΈπŸ‘»πŸŽƒπŸ•ΈπŸ‘»πŸŽƒπŸ•ΈπŸ‘»πŸŽƒπŸ•ΈπŸ‘»πŸŽƒπŸ•ΈπŸ‘»πŸŽƒπŸ•ΈπŸ‘»πŸŽƒπŸ•ΈπŸ‘»πŸŽƒπŸ•Έ

This adorable Vintage Halloween Box, I saw on Pinterest. It looks very similar. But I put my own touch to it. Mr. Skeleton rests his foot on the bow. I just want to tickle it. He smiles and gives me his approval; he loves being a part of my DIYs.

Here is a link to the original β€œDollar Tree Vintage Halloween Box” by Creating Through Chaos: https://creatingthroughchaos.com/dollar-tree-vintage-halloween-box/

πŸ‘»πŸŽƒπŸ•ΈπŸ‘»πŸŽƒπŸ•ΈπŸ‘»πŸŽƒπŸ•ΈπŸ‘»πŸŽƒπŸ•ΈπŸ‘»πŸŽƒπŸ•ΈπŸ‘»πŸŽƒπŸ•ΈπŸ‘»πŸŽƒπŸ•ΈπŸ‘»πŸŽƒπŸ•ΈπŸ‘»πŸŽƒπŸ•ΈπŸ‘»πŸŽƒπŸ•ΈπŸ‘»πŸŽƒπŸ•ΈπŸ‘»πŸŽƒπŸ•Έ

2025 · DIY · Halloween

DIY – β€œNevermore” Picture Frame & Bird Cage

πŸ‘»πŸŽƒπŸ•ΈπŸ‘»πŸŽƒπŸ•ΈπŸ‘»πŸŽƒπŸ•ΈπŸ‘»πŸŽƒπŸ•ΈπŸ‘»πŸŽƒπŸ•ΈπŸ‘»πŸŽƒπŸ•ΈπŸ‘»πŸŽƒπŸ•ΈπŸ‘»πŸŽƒπŸ•ΈπŸ‘»πŸŽƒπŸ•ΈπŸ‘»πŸŽƒπŸ•ΈπŸ‘»πŸŽƒπŸ•ΈπŸ‘»πŸŽƒπŸ•Έ

This is one of my projects, which I did late last year. I started with the frame I got from a thrift store. It was gold-colored. Originally, I wanted to keep it that way for a Christmas project. But I still had a picture of Nevermore. And I tried to put it to good use. I painted the frame with black chalk paint and lightly brushed it with gold. Once the paint was completely dry, I framed the picture. That was the easy part.

At Target, I found a birdcage; at the thrift store, I got some candle holders; at Dollar Tree, I purchased the flowers, bows, and other embellishments; and I had to order the raven from Amazon. The floor of the cage and the candle holder I painted with black chalk paint. When the paint was dry, I cut up a flower foam into the form of a cube and glued it to the cage floor. I had some black shredded paper that came as packing material with one of my orders. It became part of the nesting material when I wrapped it around to hide the foam cube. I centered the raven before I poked the flower stems into the foam to build the nest. Usually, I don’t glue the stems into the foam, so I can rearrange it for a later display. For the rim of the cage, I glued laces in place. Since the candle holder looked too plain, I made a bow and attached it to the neck. The creepy little spider gives it the extra little touch.

Inspiration from β€œMaking It My Own” by Brandy – β€œNevermore” Frame:
https://www.youtube.com/watch?v=jOH8-x59Fe0&t=9s

πŸ‘»πŸŽƒπŸ•ΈπŸ‘»πŸŽƒπŸ•ΈπŸ‘»πŸŽƒπŸ•ΈπŸ‘»πŸŽƒπŸ•ΈπŸ‘»πŸŽƒπŸ•ΈπŸ‘»πŸŽƒπŸ•ΈπŸ‘»πŸŽƒπŸ•ΈπŸ‘»πŸŽƒπŸ•ΈπŸ‘»πŸŽƒπŸ•ΈπŸ‘»πŸŽƒπŸ•ΈπŸ‘»πŸŽƒπŸ•ΈπŸ‘»πŸŽƒπŸ•Έ

2025 · DIY · Halloween

DIY-Dollar Tree Jack-o-Lantern Shelf Sitter

πŸ‘»πŸŽƒπŸ•ΈπŸ‘»πŸŽƒπŸ•ΈπŸ‘»πŸŽƒπŸ•ΈπŸ‘»πŸŽƒπŸ•ΈπŸ‘»πŸŽƒπŸ•ΈπŸ‘»πŸŽƒπŸ•ΈπŸ‘»πŸŽƒπŸ•ΈπŸ‘»πŸŽƒπŸ•ΈπŸ‘»πŸŽƒπŸ•ΈπŸ‘»πŸŽƒπŸ•ΈπŸ‘»πŸŽƒπŸ•ΈπŸ‘»πŸŽƒπŸ•Έ

DIY Jack-o-Lantern Shelf Sitter

Kevin suggested, when I’m working on DIY projects, I could make one for Katelynn and send it with the other Birthday gift to Dallas. Since I still had the metal pumpkin from the β€œHappy Halloween” sign left over. I used a wooden stand-up pumpkin from Goodwill, which I got in a two-pack for $2. Target has the same sets for $5. With black and white chalk paint, pumpkin orange acrylic paint, Halloween scrapbook paper, Dollar Tree Jenga blocks, a β€œmessy” bow, and a rope around the stem, I added some character to the pumpkin. On the back side, I worked on some Thanksgiving decorations. So, when Halloween is over, Katelynn can turn it around for the November holiday.

πŸ‘»πŸŽƒπŸ•ΈπŸ‘»πŸŽƒπŸ•ΈπŸ‘»πŸŽƒπŸ•ΈπŸ‘»πŸŽƒπŸ•ΈπŸ‘»πŸŽƒπŸ•ΈπŸ‘»πŸŽƒπŸ•ΈπŸ‘»πŸŽƒπŸ•ΈπŸ‘»πŸŽƒπŸ•ΈπŸ‘»πŸŽƒπŸ•ΈπŸ‘»πŸŽƒπŸ•ΈπŸ‘»πŸŽƒπŸ•ΈπŸ‘»πŸŽƒπŸ•Έ

2025 · DIY · Halloween

DIY-Dollar Tree Vintage Witch Sign

πŸ‘»πŸŽƒπŸ•ΈπŸ‘»πŸŽƒπŸ•ΈπŸ‘»πŸŽƒπŸ•ΈπŸ‘»πŸŽƒπŸ•ΈπŸ‘»πŸŽƒπŸ•ΈπŸ‘»πŸŽƒπŸ•ΈπŸ‘»πŸŽƒπŸ•ΈπŸ‘»πŸŽƒπŸ•ΈπŸ‘»πŸŽƒπŸ•ΈπŸ‘»πŸŽƒπŸ•ΈπŸ‘»πŸŽƒπŸ•ΈπŸ‘»πŸŽƒπŸ•Έ

β€œWitch Sign” Inspired by Brandy’s β€œMaking It My Own DIYs” on YouTube

Do you remember me posting the Halloween vintage black cat sign three days ago? There was still the β€œHappy Halloween” panel left over. Brandy from β€œMaking It My Own DIYs” had a very cute idea. But I did my own spin on it.

I had a black frame I got from Goodwill. The frame had some scratches, so I sanded it and repainted it with black chalk paint, then dabbed on PLAIDs β€œPumpkin Orange” with a round sponge brush. Once the frame was completely dry, I glued a couple of Jenga blocks on the β€œHappy Halloween” panel before I secured it to the picture frame. Next, I did the little skeleton witch. Once she was done, I made a messy bow and added everything to the frame. Now, she looks more like a Halloween Skeleton Witch/Fairy. The project turned out great. It doesn’t have to be exactly the same as what we see in videos. It’s always good to bring our own creativity to the plate.

Brandy’s Video:
https://www.youtube.com/watch?v=htCuIpYASOM&list=TLPQMDIxMDIwMjPnVXFfUuEHyQ&index=1

πŸ‘»πŸŽƒπŸ•ΈπŸ‘»πŸŽƒπŸ•ΈπŸ‘»πŸŽƒπŸ•ΈπŸ‘»πŸŽƒπŸ•ΈπŸ‘»πŸŽƒπŸ•ΈπŸ‘»πŸŽƒπŸ•ΈπŸ‘»πŸŽƒπŸ•ΈπŸ‘»πŸŽƒπŸ•ΈπŸ‘»πŸŽƒπŸ•ΈπŸ‘»πŸŽƒπŸ•ΈπŸ‘»πŸŽƒπŸ•ΈπŸ‘»πŸŽƒπŸ•Έ

2025 · DIY · Halloween

DIY-Dollar Tree Halloween Vintage Black Cat Sign

πŸ‘»πŸŽƒπŸ•ΈπŸ‘»πŸŽƒπŸ•ΈπŸ‘»πŸŽƒπŸ•ΈπŸ‘»πŸŽƒπŸ•ΈπŸ‘»πŸŽƒπŸ•ΈπŸ‘»πŸŽƒπŸ•ΈπŸ‘»πŸŽƒπŸ•ΈπŸ‘»πŸŽƒπŸ•ΈπŸ‘»πŸŽƒπŸ•ΈπŸ‘»πŸŽƒπŸ•ΈπŸ‘»πŸŽƒπŸ•ΈπŸ‘»πŸŽƒπŸ•Έ

Vintage Black Cat Sign

Since I love Halloween and I am stuck on a budget, I looked at some DIYs on YouTube. I stumbled across Brandy’s β€œMaking It My Own DIYs”. Her videos are so inspiring and make a Dollar store item look like it’s worth a lot more Dollars. It is so much fun to be creative. I fell in love with her Halloween Vintage Black Cat Sign in one of her videos. So, I gathered all the materials I could find in Dollar Tree, Goodwill, and Temu. And here is my own creation. I made it my own DIYs.

Brandy’s Video:
https://www.youtube.com/watch?v=htCuIpYASOM&list=TLPQMDIxMDIwMjPnVXFfUuEHyQ&index=1

πŸ‘»πŸŽƒπŸ•ΈπŸ‘»πŸŽƒπŸ•ΈπŸ‘»πŸŽƒπŸ•ΈπŸ‘»πŸŽƒπŸ•ΈπŸ‘»πŸŽƒπŸ•ΈπŸ‘»πŸŽƒπŸ•ΈπŸ‘»πŸŽƒπŸ•ΈπŸ‘»πŸŽƒπŸ•ΈπŸ‘»πŸŽƒπŸ•ΈπŸ‘»πŸŽƒπŸ•ΈπŸ‘»πŸŽƒπŸ•ΈπŸ‘»πŸŽƒπŸ•Έ

2025 · Autumn · DIY

Dollar Tree DIY Autumn Mason Jar Shelf Sitter (1)

πŸƒπŸ‚πŸπŸƒπŸ‚πŸπŸƒπŸ‚πŸπŸƒπŸ‚πŸπŸƒπŸ‚πŸπŸƒπŸ‚πŸπŸƒπŸ‚πŸπŸƒπŸ‚πŸπŸƒπŸ‚πŸπŸƒπŸ‚πŸπŸƒπŸ‚πŸπŸƒπŸ‚πŸ

For my DIY Autumn Shelf Sitter, I used one of those wood-pressed Mason Jars. I removed the original paper sign, galvanized metal, and bow before I sanded the “jar”. I cleaned it of the sanding dust and glued on the plaid scrapbook paper. Once the glue had dried. I sanded off the edges of the paper. For a nicer edge, I used antique wax on the sides of the “Mason Jar” and the “Hello Fall” wooden cutout sign. I waited a day to let the wax dry thoroughly.

The following day, I cut a styrofoam pumpkin in half and painted it with matte red, orange, and yellow from Folkart and Apple Barrel. And as a finish, I painted it with some gold. To bring out the ribs of the pumpkins, I painted the creases with antique wax. I also painted the stem for a more natural look. For all that, I used a thin brush.

In the meantime, I hot-glued the tie, bow, galvanized leaf, and “Hello Fall” sign to the “jar”. Since the pumpkin had some blemishes, I used some moss to cover them up. It worked perfectly sitting on the haybale. When I added the pumpkin on the haybale to the sign, I noticed that the shelf sitter can stand perfectly by itself. So, I didn’t have to add anything else. Usually, I glue a wood block for stability in the back. But it is not necessary, this time.

πŸƒπŸ‚πŸπŸƒπŸ‚πŸπŸƒπŸ‚πŸπŸƒπŸ‚πŸπŸƒπŸ‚πŸπŸƒπŸ‚πŸπŸƒπŸ‚πŸπŸƒπŸ‚πŸπŸƒπŸ‚πŸπŸƒπŸ‚πŸπŸƒπŸ‚πŸπŸƒπŸ‚πŸ

2025 · Autumn · DIY

Dollar Tree DIY-β€œHappy Fall, y’all!” Pumpkin Shelf Sitter

πŸƒπŸ‚πŸπŸƒπŸ‚πŸπŸƒπŸ‚πŸπŸƒπŸ‚πŸπŸƒπŸ‚πŸπŸƒπŸ‚πŸπŸƒπŸ‚πŸπŸƒπŸ‚πŸπŸƒπŸ‚πŸπŸƒπŸ‚πŸπŸƒπŸ‚πŸπŸƒπŸ‚πŸ

With a limited budget at hand, I always have to consider purchasing decorations from Dollar Tree and repurposing them to my own liking. There are many tutorial videos on YouTube, which give me plenty of ideas. Last year, I started with some Halloween decor. I’m still learning. It is a lot of fun to be creative and to accomplish something that I can be proud of.

The last couple of days, I worked on this pumpkin shelf sitter. The top left image shows the original purchased item. And the top right image shows my own style. Below, I will describe the process in a few photos.

I separated the pumpkin pieces and peeled off the decorative paper. After sanding and cleaning both pumpkins, I gave them a coat of white chalk paint. I let the paint completely dry. I picked one of my Autumn fabrics and glued it on the front of the taller pumpkin (I cut the fabric into a rectangle to the size of the pumpkin. It’s better to leave some fabric over the edges, which can be trimmed later.) Once the fabric was spread on the pumpkin, I brushed another coat of Mod Podge on top of it. Then I let it completely dry. The dried Mod Podge gives the fabric a paperlike texture, and the edges can easily be sanded off. Once the edges were sanded and cleaned with a baby wipe, I lightly tapped some antic wax around the edges of the pumpkin. (I always start with the wax lightly and add more as I go. This way I avoid getting too much wax on the fabric because it is much harder to correct it afterward.)

While I waited for the tall pumpkin to dry, I always worked a little bit on the smaller pumpkin. I mixed β€œPumpkin Orange” with a couple of drops of β€œChestnut” (Apple Barrel) and gave the pumpkin two coats. I always let one coat dry before I add another coat. Once the paint was dry again, I used my antic-wax around the edges. With a tissue and a small amount of antic wax, I drew the grooves to make the pumpkin look more realistic. Later, I stenciled β€œHappy Fall, y’all!” on the smaller pumpkin.

Before I glued the pumpkins together, I added a couple of Jenga blocks as risers. This gives the pumpkins a greater optical depth than being directly glued on top of each other. I still had a raffia bow, and I hot-glued it to the smaller pumpkin. For the tall pumpkin, I used burlap ribbons to make a lazy bow. And the new pumpkin shelf sitter is done.

πŸƒπŸ‚πŸπŸƒπŸ‚πŸπŸƒπŸ‚πŸπŸƒπŸ‚πŸπŸƒπŸ‚πŸπŸƒπŸ‚πŸπŸƒπŸ‚πŸπŸƒπŸ‚πŸπŸƒπŸ‚πŸπŸƒπŸ‚πŸπŸƒπŸ‚πŸπŸƒπŸ‚πŸ