2025 · DIY · Halloween

DIY – Halloween Vintage Cat ShadowΒ Box Shelf Sitter

πŸ‘»πŸŽƒπŸ•ΈπŸ‘»πŸŽƒπŸ•ΈπŸ‘»πŸŽƒπŸ•ΈπŸ‘»πŸŽƒπŸ•ΈπŸ‘»πŸŽƒπŸ•ΈπŸ‘»πŸŽƒπŸ•ΈπŸ‘»πŸŽƒπŸ•ΈπŸ‘»πŸŽƒπŸ•ΈπŸ‘»πŸŽƒπŸ•ΈπŸ‘»πŸŽƒπŸ•ΈπŸ‘»πŸŽƒπŸ•ΈπŸ‘»πŸŽƒπŸ•Έ

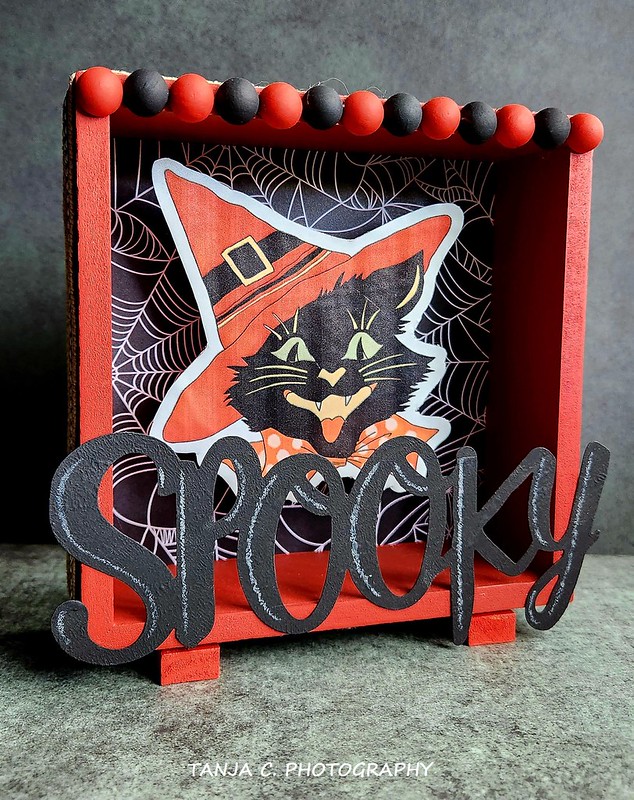
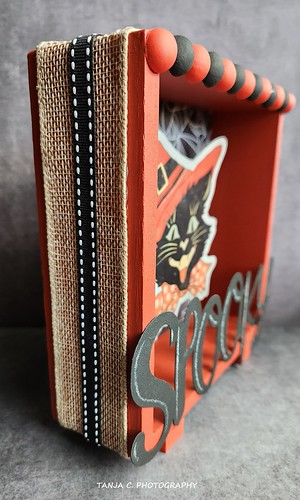
Last year, I worked on a Vintage Cat Shadow Box for Halloween. As usual, I got my inspiration from Pinterest and YouTube. I purchased items at Dollar Tree and ordered the rest from Temu and Amazon. I still have so much paint and brushes that I don’t have to worry about getting more for some time.

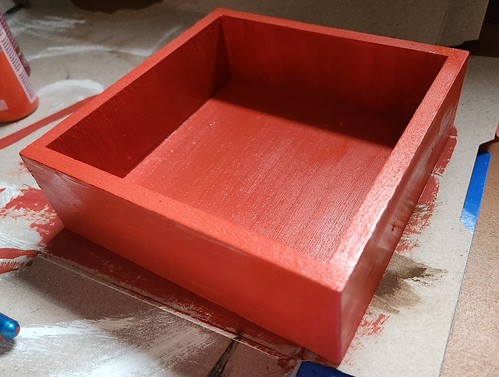
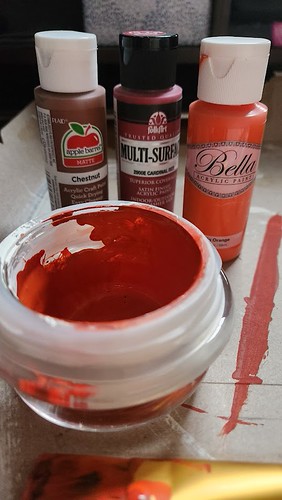
For the box, the half-rounds on top, and the risers on the bottom, I had to mix some colors of orange, cardinal red, and chestnut brown. I wanted to get it as close to the cat’s hat as possible. It became slightly darker. However, I was satisfied with the outcome. The trick to painting the half-rounds is to stick them on some tape. The tape prevents them from moving around. The same can be done with the risers.

For the inside of the box, I measured the inner space and cut some scrapbook paper to the size of the inner frame. Once I glued the paper to the back, I could work on the vintage cat sticker. The sticker itself was too flimsy. I stuck it to some cardboard to make it more stable. Behind the cat sticker, I hot-glued a Jenga riser to bring the image forward.

Something was missing. So, I decided to take one of those Halloween metal cutouts, paint it black, and let it dry before I used a white coloring pencil and drew some extra lines on the letters. The outer frame of the box still looked a little plain. I found some burlap and black ribbon. It just fits perfectly around the box. I added the two painted Jenga risers to the bottom.

The Vintage Cat Shadow Box can be used as a shelf sitter or as a tiered tray sitter. It can hang as a picture on the wall. The possibilities are endless.

πŸ‘»πŸŽƒπŸ•ΈπŸ‘»πŸŽƒπŸ•ΈπŸ‘»πŸŽƒπŸ•ΈπŸ‘»πŸŽƒπŸ•ΈπŸ‘»πŸŽƒπŸ•ΈπŸ‘»πŸŽƒπŸ•ΈπŸ‘»πŸŽƒπŸ•ΈπŸ‘»πŸŽƒπŸ•ΈπŸ‘»πŸŽƒπŸ•ΈπŸ‘»πŸŽƒπŸ•ΈπŸ‘»πŸŽƒπŸ•ΈπŸ‘»πŸŽƒπŸ•Έ

2025 · DIY · Halloween

DIY-Dollar Tree Jack-o-Lantern Shelf Sitter

πŸ‘»πŸŽƒπŸ•ΈπŸ‘»πŸŽƒπŸ•ΈπŸ‘»πŸŽƒπŸ•ΈπŸ‘»πŸŽƒπŸ•ΈπŸ‘»πŸŽƒπŸ•ΈπŸ‘»πŸŽƒπŸ•ΈπŸ‘»πŸŽƒπŸ•ΈπŸ‘»πŸŽƒπŸ•ΈπŸ‘»πŸŽƒπŸ•ΈπŸ‘»πŸŽƒπŸ•ΈπŸ‘»πŸŽƒπŸ•ΈπŸ‘»πŸŽƒπŸ•Έ

DIY Jack-o-Lantern Shelf Sitter

Kevin suggested, when I’m working on DIY projects, I could make one for Katelynn and send it with the other Birthday gift to Dallas. Since I still had the metal pumpkin from the β€œHappy Halloween” sign left over. I used a wooden stand-up pumpkin from Goodwill, which I got in a two-pack for $2. Target has the same sets for $5. With black and white chalk paint, pumpkin orange acrylic paint, Halloween scrapbook paper, Dollar Tree Jenga blocks, a β€œmessy” bow, and a rope around the stem, I added some character to the pumpkin. On the back side, I worked on some Thanksgiving decorations. So, when Halloween is over, Katelynn can turn it around for the November holiday.

πŸ‘»πŸŽƒπŸ•ΈπŸ‘»πŸŽƒπŸ•ΈπŸ‘»πŸŽƒπŸ•ΈπŸ‘»πŸŽƒπŸ•ΈπŸ‘»πŸŽƒπŸ•ΈπŸ‘»πŸŽƒπŸ•ΈπŸ‘»πŸŽƒπŸ•ΈπŸ‘»πŸŽƒπŸ•ΈπŸ‘»πŸŽƒπŸ•ΈπŸ‘»πŸŽƒπŸ•ΈπŸ‘»πŸŽƒπŸ•ΈπŸ‘»πŸŽƒπŸ•Έ

2025 · Autumn · DIY

Dollar Tree DIY Autumn Mason Jar Shelf Sitter (1)

πŸƒπŸ‚πŸπŸƒπŸ‚πŸπŸƒπŸ‚πŸπŸƒπŸ‚πŸπŸƒπŸ‚πŸπŸƒπŸ‚πŸπŸƒπŸ‚πŸπŸƒπŸ‚πŸπŸƒπŸ‚πŸπŸƒπŸ‚πŸπŸƒπŸ‚πŸπŸƒπŸ‚πŸ

For my DIY Autumn Shelf Sitter, I used one of those wood-pressed Mason Jars. I removed the original paper sign, galvanized metal, and bow before I sanded the “jar”. I cleaned it of the sanding dust and glued on the plaid scrapbook paper. Once the glue had dried. I sanded off the edges of the paper. For a nicer edge, I used antique wax on the sides of the “Mason Jar” and the “Hello Fall” wooden cutout sign. I waited a day to let the wax dry thoroughly.

The following day, I cut a styrofoam pumpkin in half and painted it with matte red, orange, and yellow from Folkart and Apple Barrel. And as a finish, I painted it with some gold. To bring out the ribs of the pumpkins, I painted the creases with antique wax. I also painted the stem for a more natural look. For all that, I used a thin brush.

In the meantime, I hot-glued the tie, bow, galvanized leaf, and “Hello Fall” sign to the “jar”. Since the pumpkin had some blemishes, I used some moss to cover them up. It worked perfectly sitting on the haybale. When I added the pumpkin on the haybale to the sign, I noticed that the shelf sitter can stand perfectly by itself. So, I didn’t have to add anything else. Usually, I glue a wood block for stability in the back. But it is not necessary, this time.

πŸƒπŸ‚πŸπŸƒπŸ‚πŸπŸƒπŸ‚πŸπŸƒπŸ‚πŸπŸƒπŸ‚πŸπŸƒπŸ‚πŸπŸƒπŸ‚πŸπŸƒπŸ‚πŸπŸƒπŸ‚πŸπŸƒπŸ‚πŸπŸƒπŸ‚πŸπŸƒπŸ‚πŸ

2025 · Autumn · DIY

Dollar Tree DIY-β€œHappy Fall, y’all!” Pumpkin Shelf Sitter

πŸƒπŸ‚πŸπŸƒπŸ‚πŸπŸƒπŸ‚πŸπŸƒπŸ‚πŸπŸƒπŸ‚πŸπŸƒπŸ‚πŸπŸƒπŸ‚πŸπŸƒπŸ‚πŸπŸƒπŸ‚πŸπŸƒπŸ‚πŸπŸƒπŸ‚πŸπŸƒπŸ‚πŸ

With a limited budget at hand, I always have to consider purchasing decorations from Dollar Tree and repurposing them to my own liking. There are many tutorial videos on YouTube, which give me plenty of ideas. Last year, I started with some Halloween decor. I’m still learning. It is a lot of fun to be creative and to accomplish something that I can be proud of.

The last couple of days, I worked on this pumpkin shelf sitter. The top left image shows the original purchased item. And the top right image shows my own style. Below, I will describe the process in a few photos.

I separated the pumpkin pieces and peeled off the decorative paper. After sanding and cleaning both pumpkins, I gave them a coat of white chalk paint. I let the paint completely dry. I picked one of my Autumn fabrics and glued it on the front of the taller pumpkin (I cut the fabric into a rectangle to the size of the pumpkin. It’s better to leave some fabric over the edges, which can be trimmed later.) Once the fabric was spread on the pumpkin, I brushed another coat of Mod Podge on top of it. Then I let it completely dry. The dried Mod Podge gives the fabric a paperlike texture, and the edges can easily be sanded off. Once the edges were sanded and cleaned with a baby wipe, I lightly tapped some antic wax around the edges of the pumpkin. (I always start with the wax lightly and add more as I go. This way I avoid getting too much wax on the fabric because it is much harder to correct it afterward.)

While I waited for the tall pumpkin to dry, I always worked a little bit on the smaller pumpkin. I mixed β€œPumpkin Orange” with a couple of drops of β€œChestnut” (Apple Barrel) and gave the pumpkin two coats. I always let one coat dry before I add another coat. Once the paint was dry again, I used my antic-wax around the edges. With a tissue and a small amount of antic wax, I drew the grooves to make the pumpkin look more realistic. Later, I stenciled β€œHappy Fall, y’all!” on the smaller pumpkin.

Before I glued the pumpkins together, I added a couple of Jenga blocks as risers. This gives the pumpkins a greater optical depth than being directly glued on top of each other. I still had a raffia bow, and I hot-glued it to the smaller pumpkin. For the tall pumpkin, I used burlap ribbons to make a lazy bow. And the new pumpkin shelf sitter is done.

πŸƒπŸ‚πŸπŸƒπŸ‚πŸπŸƒπŸ‚πŸπŸƒπŸ‚πŸπŸƒπŸ‚πŸπŸƒπŸ‚πŸπŸƒπŸ‚πŸπŸƒπŸ‚πŸπŸƒπŸ‚πŸπŸƒπŸ‚πŸπŸƒπŸ‚πŸπŸƒπŸ‚πŸ