❄☃❄☃❄☃❄☃❄☃❄☃❄☃❄☃❄☃❄☃❄☃❄☃❄☃❄☃❄☃❄☃❄☃❄

Winter in Texas (2004, 2007)
❄☃❄☃❄☃❄☃❄☃❄☃❄☃❄☃❄☃❄☃❄☃❄☃❄☃❄☃❄☃❄☃❄☃❄
A Texas city girl in a small New England town …

❄☃❄☃❄☃❄☃❄☃❄☃❄☃❄☃❄☃❄☃❄☃❄☃❄☃❄☃❄☃❄☃❄☃❄
❄☃❄☃❄☃❄☃❄☃❄☃❄☃❄☃❄☃❄☃❄☃❄☃❄☃❄☃❄☃❄☃❄☃❄
🦃🌽🦃🌽🦃🌽🦃🌽🦃🌽🦃🌽🦃🌽🦃🌽🦃🌽🦃🌽🦃🌽🦃🌽🦃🌽🦃🌽🦃🌽🦃🌽🦃🌽🦃🌽

🦃🌽🦃🌽🦃🌽🦃🌽🦃🌽🦃🌽🦃🌽🦃🌽🦃🌽🦃🌽🦃🌽🦃🌽🦃🌽🦃🌽🦃🌽🦃🌽🦃🌽🦃🌽
👻🎃🕸👻🎃🕸👻🎃🕸👻🎃🕸👻🎃🕸👻🎃🕸👻🎃🕸👻🎃🕸👻🎃🕸👻🎃🕸👻🎃🕸👻🎃🕸
This cute vintage door hanger was inspired by “Making It My Own DIYs” on YouTube. The only difference I made to my own hanger was that I didn’t make a bow and left it in its original state.
Here is the YouTube Video: “Making It My Own DIYs” by Brandy. It begins at minute 10:50. https://www.youtube.com/watch?v=9-YmktOY304
👻🎃🕸👻🎃🕸👻🎃🕸👻🎃🕸👻🎃🕸👻🎃🕸👻🎃🕸👻🎃🕸👻🎃🕸👻🎃🕸👻🎃🕸👻🎃🕸
👻🎃🕸👻🎃🕸👻🎃🕸👻🎃🕸👻🎃🕸👻🎃🕸👻🎃🕸👻🎃🕸👻🎃🕸👻🎃🕸👻🎃🕸👻🎃🕸
Another cute little Black Cat Shadow Box I made for the Halloween Season.
👻🎃🕸👻🎃🕸👻🎃🕸👻🎃🕸👻🎃🕸👻🎃🕸👻🎃🕸👻🎃🕸👻🎃🕸👻🎃🕸👻🎃🕸👻🎃🕸
👻🎃🕸👻🎃🕸👻🎃🕸👻🎃🕸👻🎃🕸👻🎃🕸👻🎃🕸👻🎃🕸👻🎃🕸👻🎃🕸👻🎃🕸👻🎃🕸
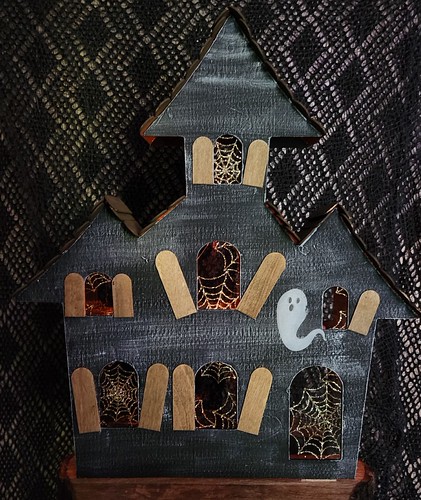
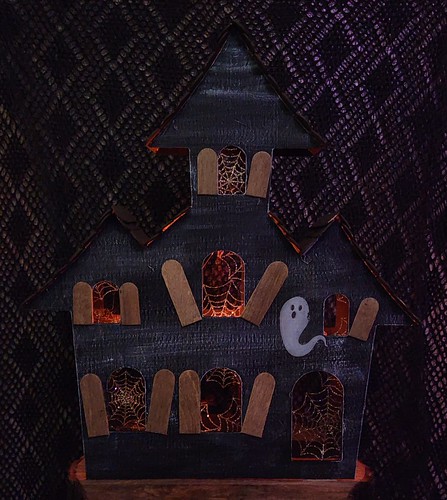
I kept the haunted house simple. I used two wooden cutouts, Jenga blocks as spacers, popsicles as shingles and window shutters, a large ribbon for the windows, a rub-on sticker ghost, orange fairy lights, paints, and hot glue.
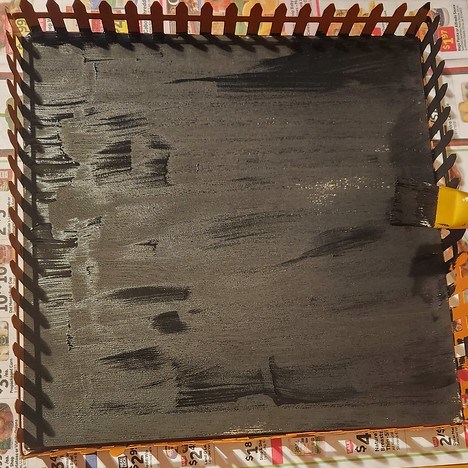
First, I painted the wooden cutouts and Jenga blocks with black chalk paint and let them dry. Meanwhile, I painted the popsicles for the shingles with a mixture of chestnut brown and black chalk paint. The popsicles for the shutters, I stained with anti-wax. When the cutouts were dry, I lightly brushed the one I wanted to use as the front with white chalk paint and let it dry again.
Next, cut out a big spider web ribbon in rectangles and glued them on the backside to cover up the front windows. I added the shutters in different directions to make them look like they are ready to fall off. I rubbed my little “Boo” ghost close to one window. Once the front was done. I glued the front and back sides together with spacers. I also added extra spacers to rest my battery box for easy access to them. Then I glued the shingles on the roof.
Last but not least, I wrapped the fairy lights around the Jenga block spacers. Now, we also have a big haunted house as a shelf or mantel sitter.
👻🎃🕸👻🎃🕸👻🎃🕸👻🎃🕸👻🎃🕸👻🎃🕸👻🎃🕸👻🎃🕸👻🎃🕸👻🎃🕸👻🎃🕸👻🎃🕸
👻🎃🕸👻🎃🕸👻🎃🕸👻🎃🕸👻🎃🕸👻🎃🕸👻🎃🕸👻🎃🕸👻🎃🕸👻🎃🕸👻🎃🕸👻🎃🕸
This adorable Vintage Halloween Box, I saw on Pinterest. It looks very similar. But I put my own touch to it. Mr. Skeleton rests his foot on the bow. I just want to tickle it. He smiles and gives me his approval; he loves being a part of my DIYs.
Here is a link to the original “Dollar Tree Vintage Halloween Box” by Creating Through Chaos: https://creatingthroughchaos.com/dollar-tree-vintage-halloween-box/
👻🎃🕸👻🎃🕸👻🎃🕸👻🎃🕸👻🎃🕸👻🎃🕸👻🎃🕸👻🎃🕸👻🎃🕸👻🎃🕸👻🎃🕸👻🎃🕸
👻🎃🕸👻🎃🕸👻🎃🕸👻🎃🕸👻🎃🕸👻🎃🕸👻🎃🕸👻🎃🕸👻🎃🕸👻🎃🕸👻🎃🕸👻🎃🕸
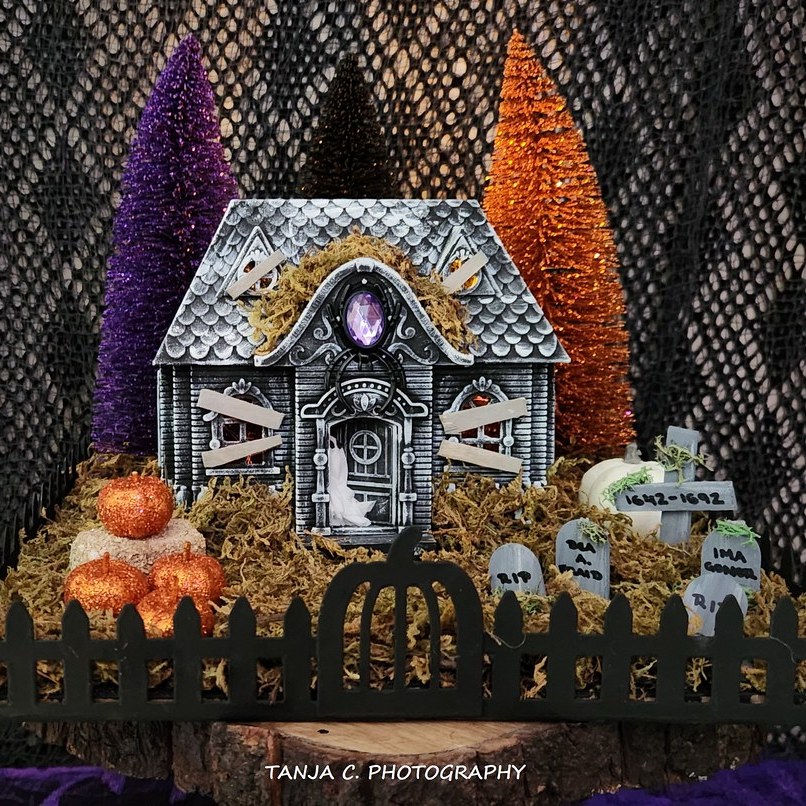
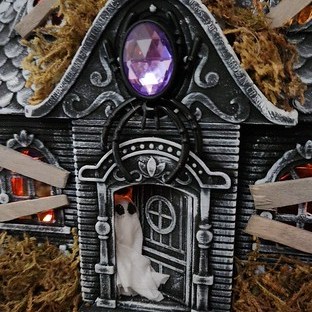
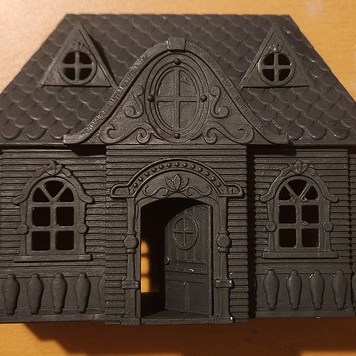
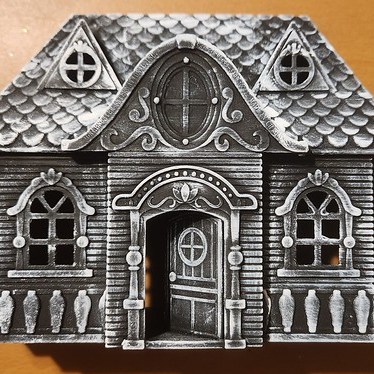
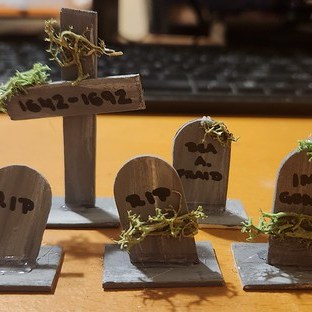
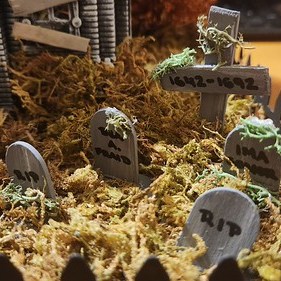
One of my favorite projects was converting a Dollar Tree Dollhouse into a Haunted House. The wooden bottom with the fence came from Target; the rest of the items are from Dollar Tree. The house I painted with black chalk paint inside and outside. In the meantime, I hot-glued the trees as a background on the “property”. After the paint was dry, I lightly brushed it with white chalk paint to show the crevices. I used some Jenga blocks to raise the house because I didn’t want it buried in the peat moss.
Since the doll house had furniture and a couple of people, I used one person and a tissue to make a little ghost. For the eyes, I used bits of pipe cleaner. The haunted house also has nailed-up windows and a creepy spider. And I added more moss to the roof.
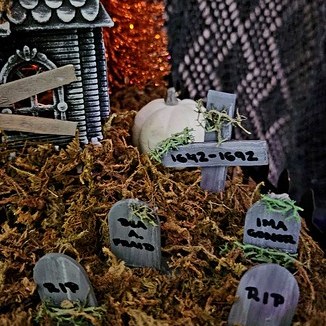
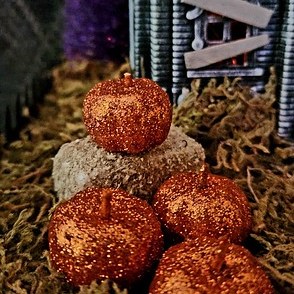
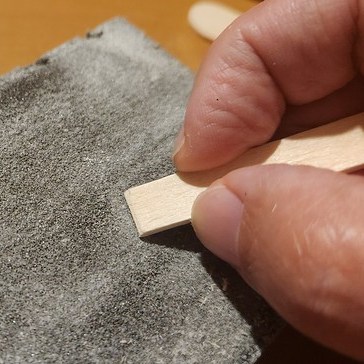
What would be a haunted house without a pumpkin patch and a graveyard? For the pumpkin patch, I found those little glitter pumpkins and tiny hay bales to raise one pumpkin up. For the graveyard, I used popsicle sticks, cut them to size, painted them to look like slate, wrote some funny names on the gravestones, and glued them across the pumpkin patch.
Finally, I installed orange fairy lights in the haunted house to give it a spooky look. I made sure I left space between the trees and the house for easy access to the batteries. I also kept the haunted house display simple. Could I have added some bats, more ghosts, witches, and trick-or-treaters? Yes. However, I didn’t want it to look too busy. And there is always room for another project.


👻🎃🕸👻🎃🕸👻🎃🕸👻🎃🕸👻🎃🕸👻🎃🕸👻🎃🕸👻🎃🕸👻🎃🕸👻🎃🕸👻🎃🕸👻🎃🕸
👻🎃🕸👻🎃🕸👻🎃🕸👻🎃🕸👻🎃🕸👻🎃🕸👻🎃🕸👻🎃🕸👻🎃🕸👻🎃🕸👻🎃🕸👻🎃🕸
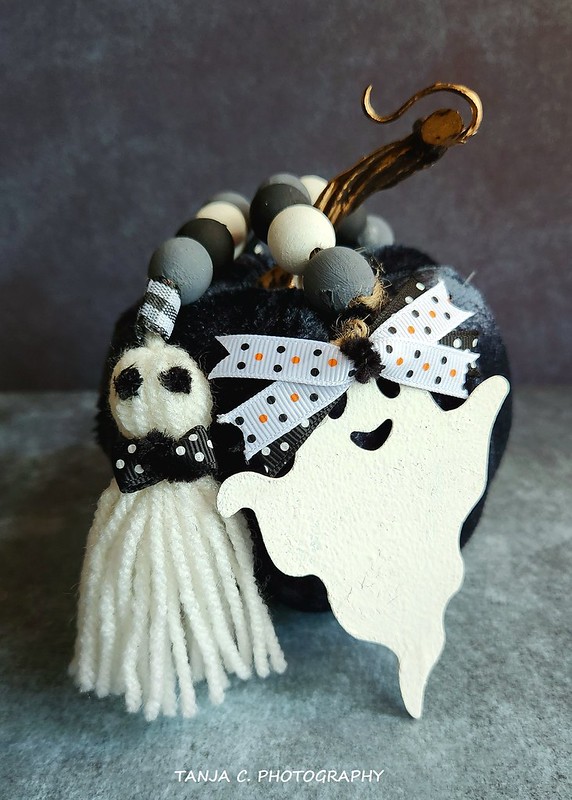
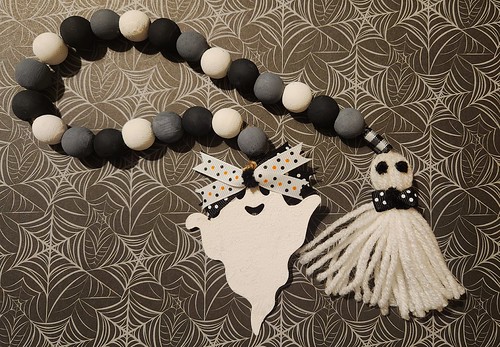
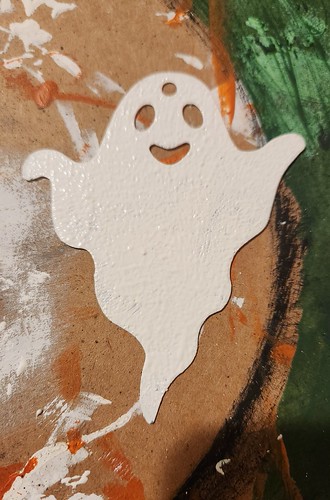
This garland was really easy to make. I used some pipe cleaner ribbons, twine, wood beads, a galvanized metal ghost, and yarn, which I had hung from a Dollar Tree Halloween sign.
◊◊◊◊◊
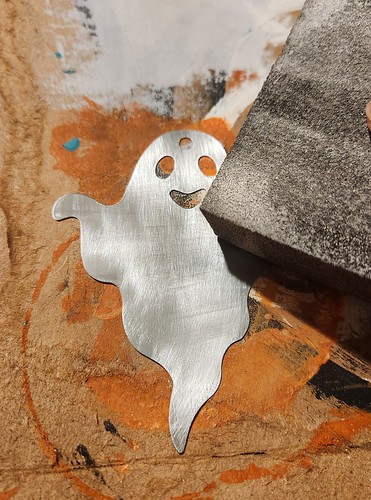
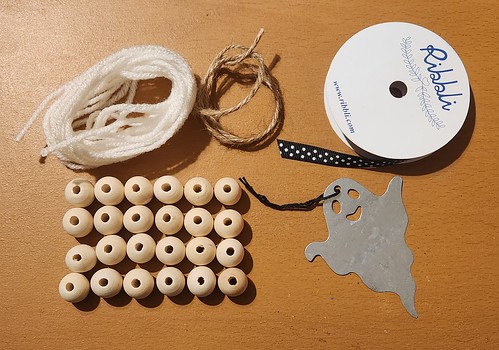
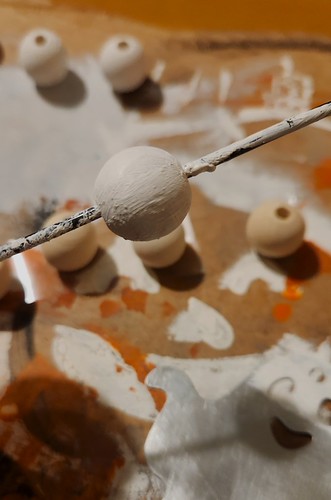
I counted 24 wood beads, painted 8 white, and 8 black, and then mixed black and white to paint the last 8 beads gray. The galvanized metal ghost I sanded for the chalk paint to stick better to the surface. I let the beads and ghost sit to dry.
Meanwhile, I wrapped a white yarn around my hand about 20 to 25 times to make a tassel. First, I drew some eyes with a marker on the little ghost. But I decided to use tiny bits of pipe cleaners for the eyes. Since it is a boy ghost, it needed a cute little bowtie, which I made from a ribbon and a pipe cleaner. The galvanized metal ghost is a girl and has a head bow.
In the end, I attached the twine to the girl ghost, fed it through the wood beads, and finished it by knotting it together with the boy ghost. Since I had a little happy accident with the knots, I just glued a little piece of ribbon around them to make it look like it belonged there.
👻🎃🕸👻🎃🕸👻🎃🕸👻🎃🕸👻🎃🕸👻🎃🕸👻🎃🕸👻🎃🕸👻🎃🕸👻🎃🕸👻🎃🕸👻🎃🕸
👻🎃🕸👻🎃🕸👻🎃🕸👻🎃🕸👻🎃🕸👻🎃🕸👻🎃🕸👻🎃🕸👻🎃🕸👻🎃🕸👻🎃🕸👻🎃🕸
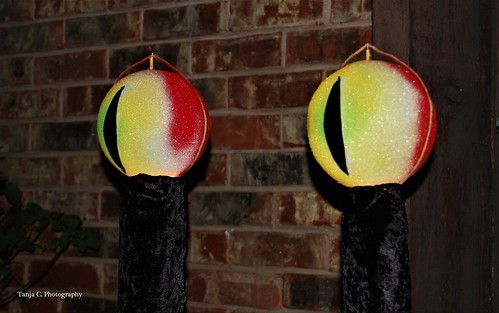
Kevin had a couple of motors he wanted to use for something neat on Halloween. He decided to make moving cat eyes. A couple of tiki candle holders, styrofoam balls, and spray paint needed to be purchased. The strings, wooden picks, black foam sheets, and velvet fabric we had lying around the house. Kevin also installed some mini light bulbs inside the eyeballs. So, they were glowing while they moved and stared at everyone.
👻🎃🕸👻🎃🕸👻🎃🕸👻🎃🕸👻🎃🕸👻🎃🕸👻🎃🕸👻🎃🕸👻🎃🕸👻🎃🕸👻🎃🕸👻🎃🕸
👻🎃🕸👻🎃🕸👻🎃🕸👻🎃🕸👻🎃🕸👻🎃🕸👻🎃🕸👻🎃🕸👻🎃🕸👻🎃🕸👻🎃🕸👻🎃🕸
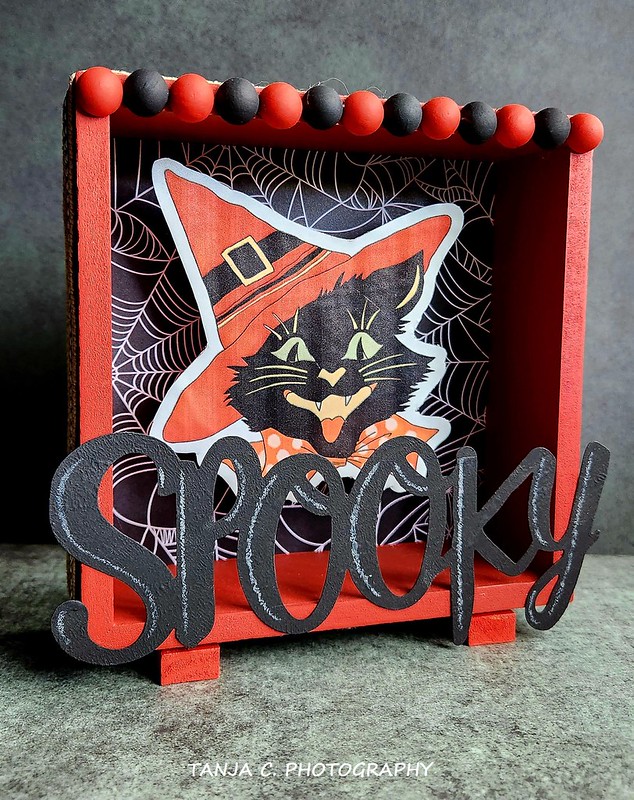
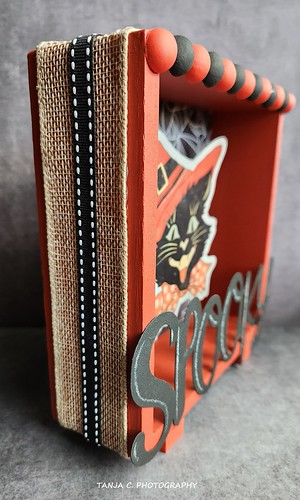
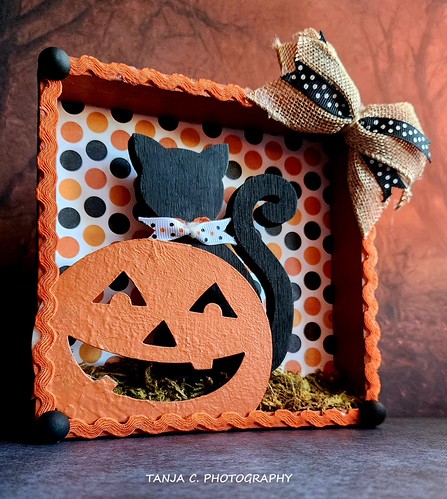
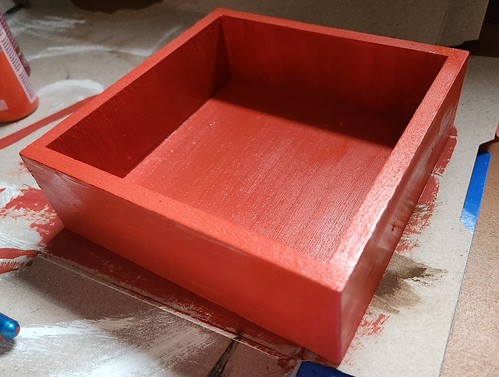
Last year, I worked on a Vintage Cat Shadow Box for Halloween. As usual, I got my inspiration from Pinterest and YouTube. I purchased items at Dollar Tree and ordered the rest from Temu and Amazon. I still have so much paint and brushes that I don’t have to worry about getting more for some time.
For the box, the half-rounds on top, and the risers on the bottom, I had to mix some colors of orange, cardinal red, and chestnut brown. I wanted to get it as close to the cat’s hat as possible. It became slightly darker. However, I was satisfied with the outcome. The trick to painting the half-rounds is to stick them on some tape. The tape prevents them from moving around. The same can be done with the risers.
For the inside of the box, I measured the inner space and cut some scrapbook paper to the size of the inner frame. Once I glued the paper to the back, I could work on the vintage cat sticker. The sticker itself was too flimsy. I stuck it to some cardboard to make it more stable. Behind the cat sticker, I hot-glued a Jenga riser to bring the image forward.
Something was missing. So, I decided to take one of those Halloween metal cutouts, paint it black, and let it dry before I used a white coloring pencil and drew some extra lines on the letters. The outer frame of the box still looked a little plain. I found some burlap and black ribbon. It just fits perfectly around the box. I added the two painted Jenga risers to the bottom.
The Vintage Cat Shadow Box can be used as a shelf sitter or as a tiered tray sitter. It can hang as a picture on the wall. The possibilities are endless.

👻🎃🕸👻🎃🕸👻🎃🕸👻🎃🕸👻🎃🕸👻🎃🕸👻🎃🕸👻🎃🕸👻🎃🕸👻🎃🕸👻🎃🕸👻🎃🕸
👻🎃🕸👻🎃🕸👻🎃🕸👻🎃🕸👻🎃🕸👻🎃🕸👻🎃🕸👻🎃🕸👻🎃🕸👻🎃🕸👻🎃🕸👻🎃🕸
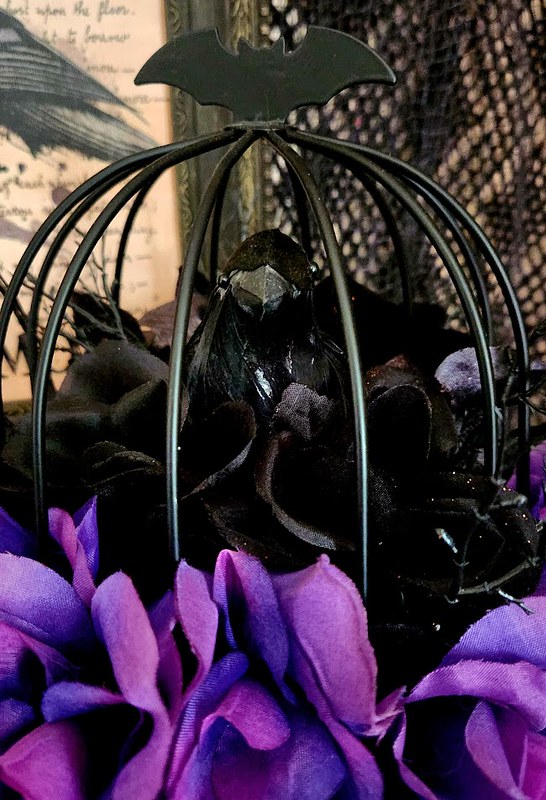
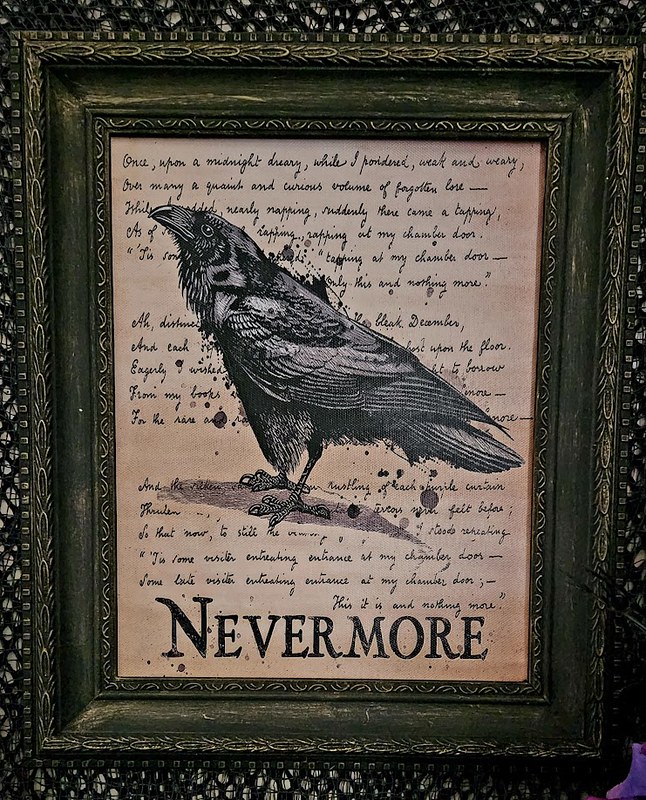
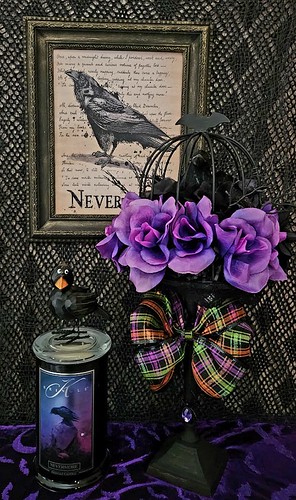
This is one of my projects, which I did late last year. I started with the frame I got from a thrift store. It was gold-colored. Originally, I wanted to keep it that way for a Christmas project. But I still had a picture of Nevermore. And I tried to put it to good use. I painted the frame with black chalk paint and lightly brushed it with gold. Once the paint was completely dry, I framed the picture. That was the easy part.
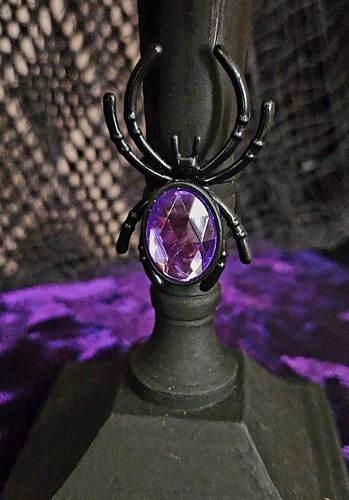
At Target, I found a birdcage; at the thrift store, I got some candle holders; at Dollar Tree, I purchased the flowers, bows, and other embellishments; and I had to order the raven from Amazon. The floor of the cage and the candle holder I painted with black chalk paint. When the paint was dry, I cut up a flower foam into the form of a cube and glued it to the cage floor. I had some black shredded paper that came as packing material with one of my orders. It became part of the nesting material when I wrapped it around to hide the foam cube. I centered the raven before I poked the flower stems into the foam to build the nest. Usually, I don’t glue the stems into the foam, so I can rearrange it for a later display. For the rim of the cage, I glued laces in place. Since the candle holder looked too plain, I made a bow and attached it to the neck. The creepy little spider gives it the extra little touch.
Inspiration from “Making It My Own” by Brandy – “Nevermore” Frame:
https://www.youtube.com/watch?v=jOH8-x59Fe0&t=9s
👻🎃🕸👻🎃🕸👻🎃🕸👻🎃🕸👻🎃🕸👻🎃🕸👻🎃🕸👻🎃🕸👻🎃🕸👻🎃🕸👻🎃🕸👻🎃🕸
👻🎃🕸👻🎃🕸👻🎃🕸👻🎃🕸👻🎃🕸👻🎃🕸👻🎃🕸👻🎃🕸👻🎃🕸👻🎃🕸👻🎃🕸👻🎃🕸
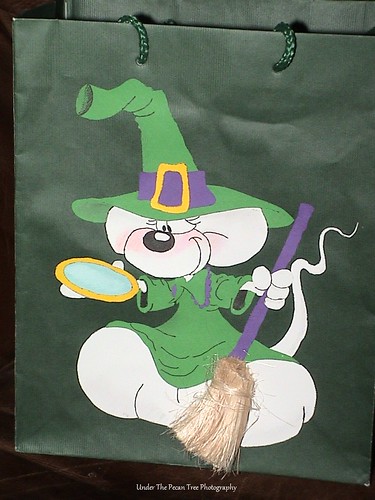
Diddlina is Diddl’s girlfriend. When I was younger, I collected everything about Diddl and his friends. I even made my own journals by drawing pictures of them. In October 2005, I created Katelynn’s Trick-or-Treat bag myself. The bag I had from a previous occasion. I imaged the concept, traced it, and then glued the tracing to construction paper. The broom got some tinsel I found in an art supply store. I used a black pen to color the face, hands, feet, hat, and costume, giving it character. And voilà, Katelynn had a Trick-or-Treat bag like no other.
👻🎃🕸👻🎃🕸👻🎃🕸👻🎃🕸👻🎃🕸👻🎃🕸👻🎃🕸👻🎃🕸👻🎃🕸👻🎃🕸👻🎃🕸👻🎃🕸
👻🎃🕸👻🎃🕸👻🎃🕸👻🎃🕸👻🎃🕸👻🎃🕸👻🎃🕸👻🎃🕸👻🎃🕸👻🎃🕸👻🎃🕸👻🎃🕸

Kevin suggested, when I’m working on DIY projects, I could make one for Katelynn and send it with the other Birthday gift to Dallas. Since I still had the metal pumpkin from the “Happy Halloween” sign left over. I used a wooden stand-up pumpkin from Goodwill, which I got in a two-pack for $2. Target has the same sets for $5. With black and white chalk paint, pumpkin orange acrylic paint, Halloween scrapbook paper, Dollar Tree Jenga blocks, a “messy” bow, and a rope around the stem, I added some character to the pumpkin. On the back side, I worked on some Thanksgiving decorations. So, when Halloween is over, Katelynn can turn it around for the November holiday.
👻🎃🕸👻🎃🕸👻🎃🕸👻🎃🕸👻🎃🕸👻🎃🕸👻🎃🕸👻🎃🕸👻🎃🕸👻🎃🕸👻🎃🕸👻🎃🕸
👻🎃🕸👻🎃🕸👻🎃🕸👻🎃🕸👻🎃🕸👻🎃🕸👻🎃🕸👻🎃🕸👻🎃🕸👻🎃🕸👻🎃🕸👻🎃🕸
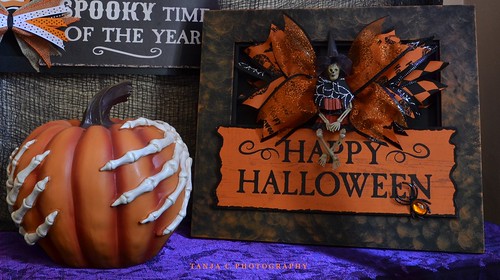
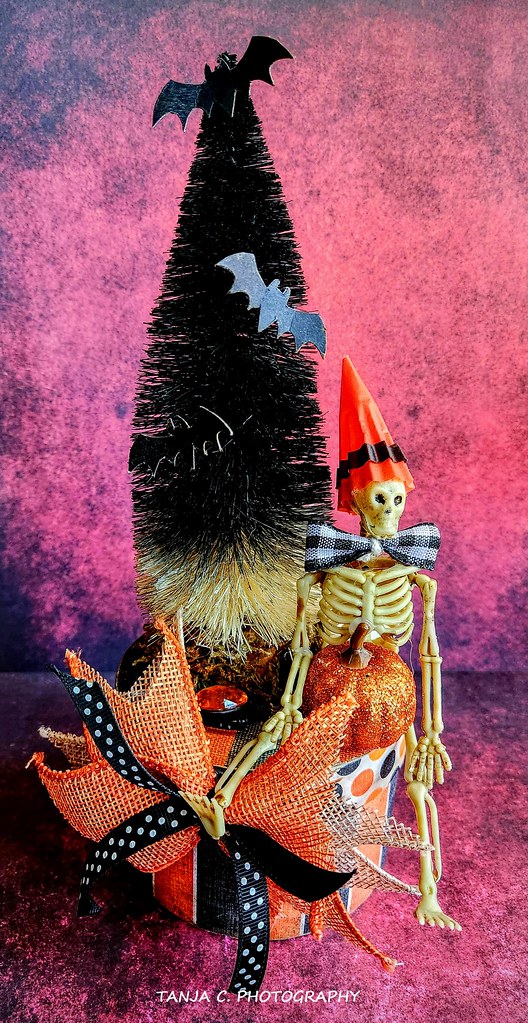
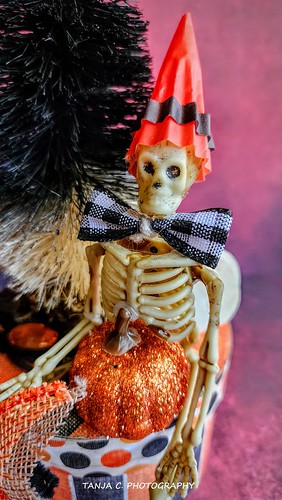
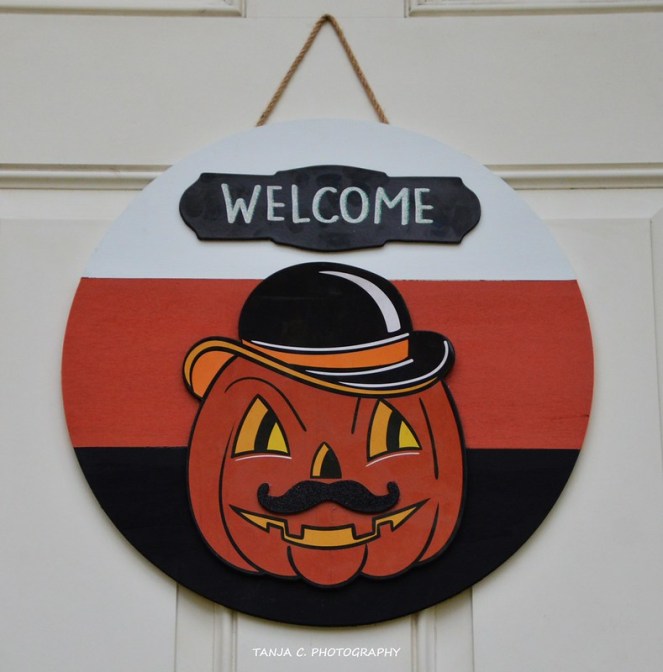
Do you remember me posting the Halloween vintage black cat sign three days ago? There was still the “Happy Halloween” panel left over. Brandy from “Making It My Own DIYs” had a very cute idea. But I did my own spin on it.
I had a black frame I got from Goodwill. The frame had some scratches, so I sanded it and repainted it with black chalk paint, then dabbed on PLAIDs “Pumpkin Orange” with a round sponge brush. Once the frame was completely dry, I glued a couple of Jenga blocks on the “Happy Halloween” panel before I secured it to the picture frame. Next, I did the little skeleton witch. Once she was done, I made a messy bow and added everything to the frame. Now, she looks more like a Halloween Skeleton Witch/Fairy. The project turned out great. It doesn’t have to be exactly the same as what we see in videos. It’s always good to bring our own creativity to the plate.
Brandy’s Video:
https://www.youtube.com/watch?v=htCuIpYASOM&list=TLPQMDIxMDIwMjPnVXFfUuEHyQ&index=1
👻🎃🕸👻🎃🕸👻🎃🕸👻🎃🕸👻🎃🕸👻🎃🕸👻🎃🕸👻🎃🕸👻🎃🕸👻🎃🕸👻🎃🕸👻🎃🕸
🎃👻🎃👻🎃👻🎃👻🎃👻🎃👻🎃👻🎃👻🎃👻🎃👻🎃👻🎃👻🎃👻🎃👻🎃👻🎃👻🎃👻🎃👻
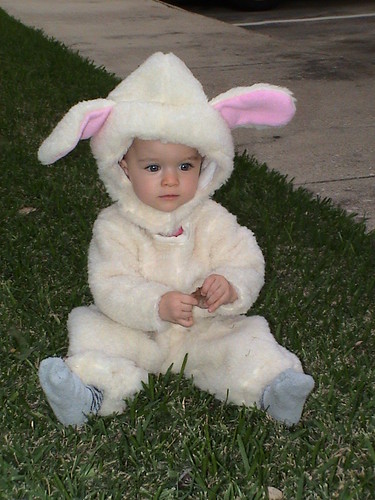
In 2004, I saw a little lamb costume for Katelynn. She was so cute. Unfortunately, I made the hat piece a little bit too big. But that was okay. She had a lot of fun getting candy on Halloween night.
🎃👻🎃👻🎃👻🎃👻🎃👻🎃👻🎃👻🎃👻🎃👻🎃👻🎃👻🎃👻🎃👻🎃👻🎃👻🎃👻🎃👻🎃👻
👻🎃🕸👻🎃🕸👻🎃🕸👻🎃🕸👻🎃🕸👻🎃🕸👻🎃🕸👻🎃🕸👻🎃🕸👻🎃🕸👻🎃🕸👻🎃🕸
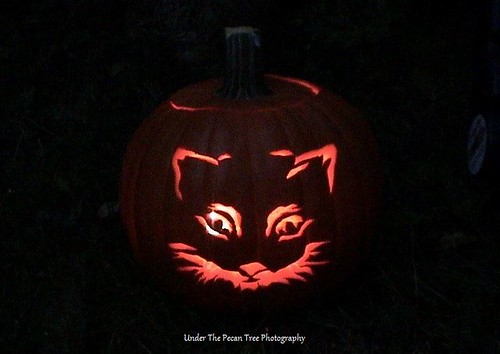

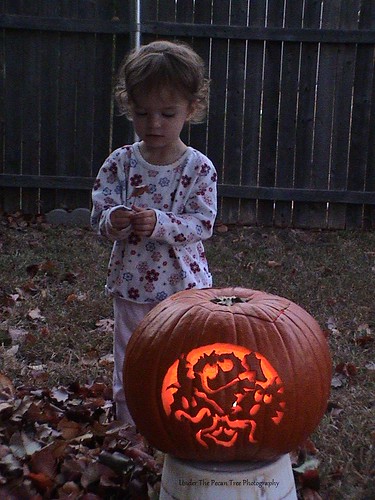
This was Katelynn’s First Halloween. She was only 27 days old when I carved the Kitty pumpkin for her. The story behind the pumpkin itself can be found here under this link:
https://underthewhiteoakleaves.com/2022/10/01/my-jack-o-lanterns-2003-2007/
👻🎃🕸👻🎃🕸👻🎃🕸👻🎃🕸👻🎃🕸👻🎃🕸👻🎃🕸👻🎃🕸👻🎃🕸👻🎃🕸👻🎃🕸👻🎃🕸
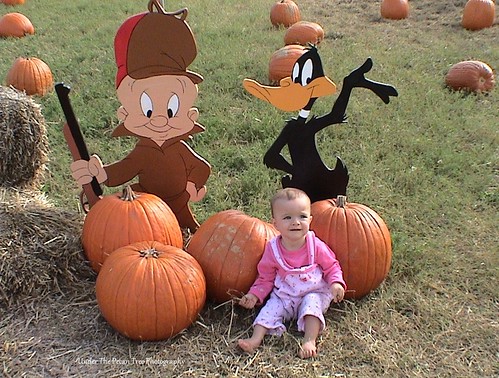

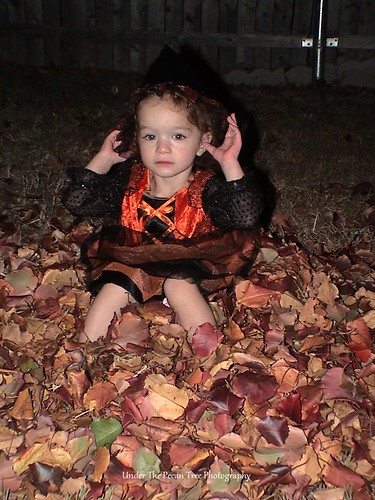
Katelynn was at the Flower Mound Pumpkin Patch for the first time. Oh, she had so much fun playing with the straw. Kevin and I had to fish it out of her clothes later. She was so busy throwing the straw in the air, it went everywhere. The next day, we dressed her up as a lamb. I made the costume myself. The head was a bit big for her. She enjoyed going to Trick-or-Treat with it.
👻🎃🕸👻🎃🕸👻🎃🕸👻🎃🕸👻🎃🕸👻🎃🕸👻🎃🕸👻🎃🕸👻🎃🕸👻🎃🕸👻🎃🕸👻🎃🕸

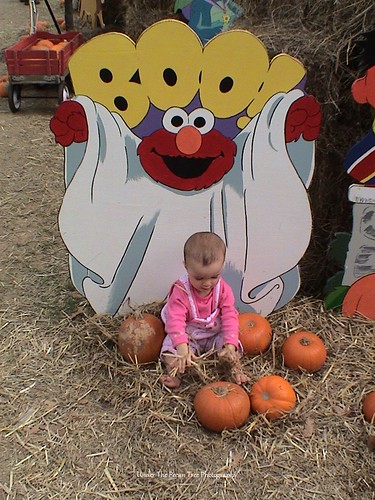
It was the first year we celebrated Halloween at our new house. I made a DIY-Diddlina candy bag for all the goodies we would receive from going to Trick-or-Treat. On the other hand, Katelynn was still little and a bit unsure if she really liked this whole “Trick-or-Treat” thing. When we walked from door to door, she wasn’t very happy. Once she had some candy, it wasn’t nearly as bad anymore. But she did not like the door-to-door walk at all. A year later, this would be a whole other story. …
👻🎃🕸👻🎃🕸👻🎃🕸👻🎃🕸👻🎃🕸👻🎃🕸👻🎃🕸👻🎃🕸👻🎃🕸👻🎃🕸👻🎃🕸👻🎃🕸
… to be continued …
👻🎃🕸👻🎃🕸👻🎃🕸👻🎃🕸👻🎃🕸👻🎃🕸👻🎃🕸👻🎃🕸👻🎃🕸👻🎃🕸👻🎃🕸👻🎃🕸

Since I love Halloween and I am stuck on a budget, I looked at some DIYs on YouTube. I stumbled across Brandy’s “Making It My Own DIYs”. Her videos are so inspiring and make a Dollar store item look like it’s worth a lot more Dollars. It is so much fun to be creative. I fell in love with her Halloween Vintage Black Cat Sign in one of her videos. So, I gathered all the materials I could find in Dollar Tree, Goodwill, and Temu. And here is my own creation. I made it my own DIYs.
👻🎃🕸👻🎃🕸👻🎃🕸👻🎃🕸👻🎃🕸👻🎃🕸👻🎃🕸👻🎃🕸👻🎃🕸👻🎃🕸👻🎃🕸👻🎃🕸
🍃🍂🍁🍃🍂🍁🍃🍂🍁🍃🍂🍁🍃🍂🍁🍃🍂🍁🍃🍂🍁🍃🍂🍁🍃🍂🍁🍃🍂🍁🍃🍂🍁🍃🍂🍁
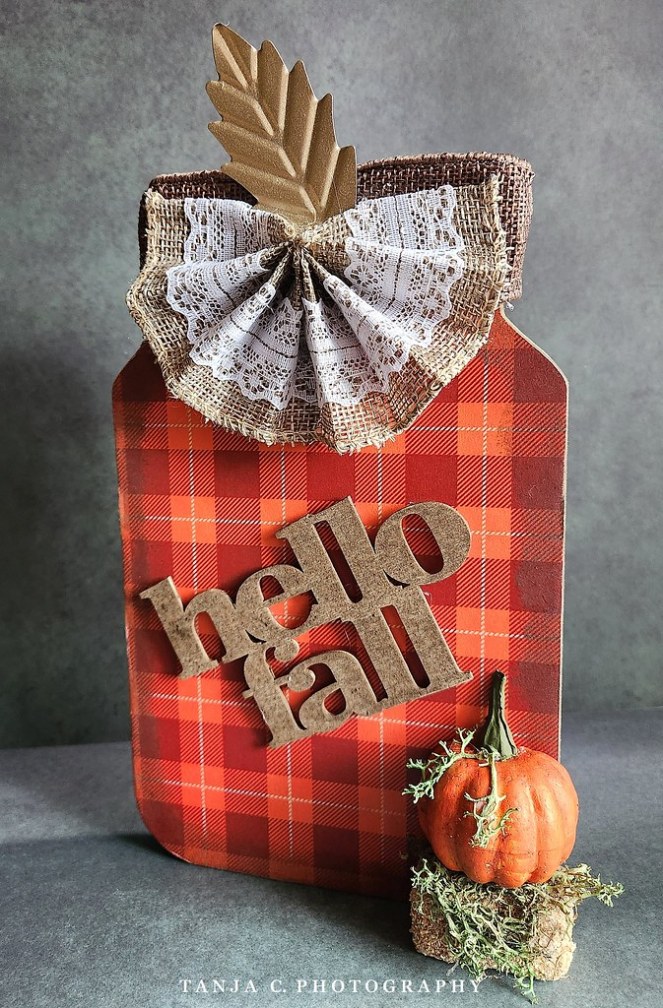
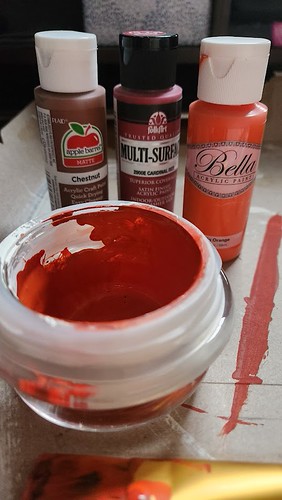
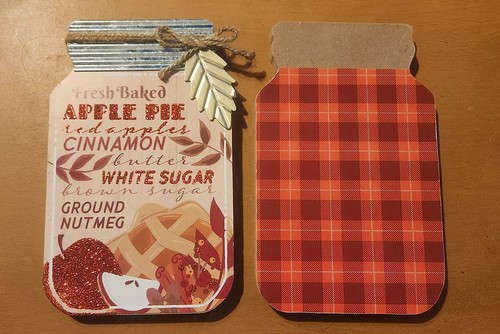
For my DIY Autumn Shelf Sitter, I used one of those wood-pressed Mason Jars. I removed the original paper sign, galvanized metal, and bow before I sanded the “jar”. I cleaned it of the sanding dust and glued on the plaid scrapbook paper. Once the glue had dried. I sanded off the edges of the paper. For a nicer edge, I used antique wax on the sides of the “Mason Jar” and the “Hello Fall” wooden cutout sign. I waited a day to let the wax dry thoroughly.
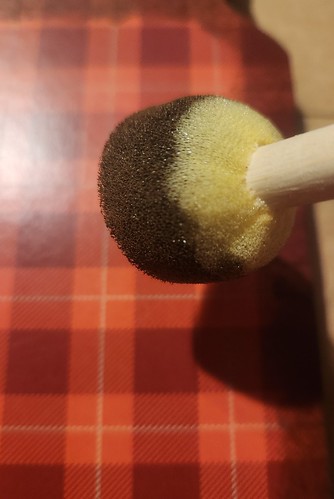
The following day, I cut a styrofoam pumpkin in half and painted it with matte red, orange, and yellow from Folkart and Apple Barrel. And as a finish, I painted it with some gold. To bring out the ribs of the pumpkins, I painted the creases with antique wax. I also painted the stem for a more natural look. For all that, I used a thin brush.
In the meantime, I hot-glued the tie, bow, galvanized leaf, and “Hello Fall” sign to the “jar”. Since the pumpkin had some blemishes, I used some moss to cover them up. It worked perfectly sitting on the haybale. When I added the pumpkin on the haybale to the sign, I noticed that the shelf sitter can stand perfectly by itself. So, I didn’t have to add anything else. Usually, I glue a wood block for stability in the back. But it is not necessary, this time.


🍃🍂🍁🍃🍂🍁🍃🍂🍁🍃🍂🍁🍃🍂🍁🍃🍂🍁🍃🍂🍁🍃🍂🍁🍃🍂🍁🍃🍂🍁🍃🍂🍁🍃🍂🍁
🍃🍂🍁🍃🍂🍁🍃🍂🍁🍃🍂🍁🍃🍂🍁🍃🍂🍁🍃🍂🍁🍃🍂🍁🍃🍂🍁🍃🍂🍁🍃🍂🍁🍃🍂🍁
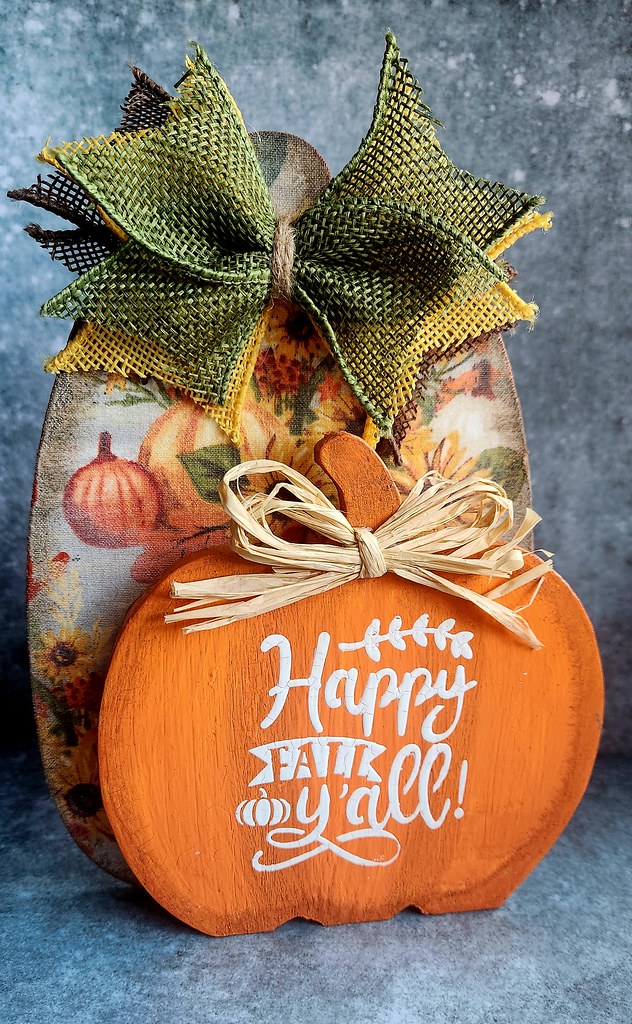
With a limited budget at hand, I always have to consider purchasing decorations from Dollar Tree and repurposing them to my own liking. There are many tutorial videos on YouTube, which give me plenty of ideas. Last year, I started with some Halloween decor. I’m still learning. It is a lot of fun to be creative and to accomplish something that I can be proud of.
The last couple of days, I worked on this pumpkin shelf sitter. The top left image shows the original purchased item. And the top right image shows my own style. Below, I will describe the process in a few photos.
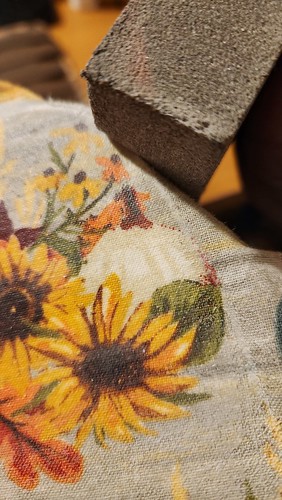

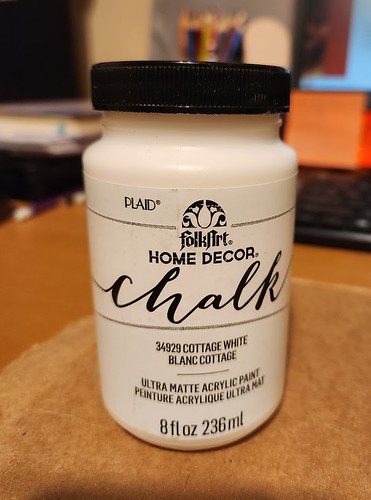
I separated the pumpkin pieces and peeled off the decorative paper. After sanding and cleaning both pumpkins, I gave them a coat of white chalk paint. I let the paint completely dry. I picked one of my Autumn fabrics and glued it on the front of the taller pumpkin (I cut the fabric into a rectangle to the size of the pumpkin. It’s better to leave some fabric over the edges, which can be trimmed later.) Once the fabric was spread on the pumpkin, I brushed another coat of Mod Podge on top of it. Then I let it completely dry. The dried Mod Podge gives the fabric a paperlike texture, and the edges can easily be sanded off. Once the edges were sanded and cleaned with a baby wipe, I lightly tapped some antic wax around the edges of the pumpkin. (I always start with the wax lightly and add more as I go. This way I avoid getting too much wax on the fabric because it is much harder to correct it afterward.)
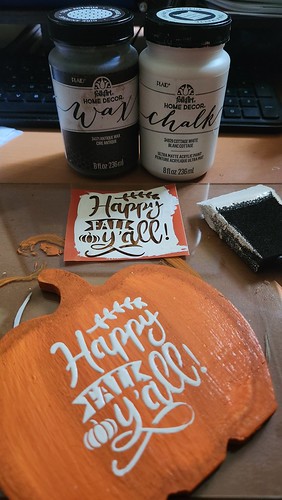
While I waited for the tall pumpkin to dry, I always worked a little bit on the smaller pumpkin. I mixed “Pumpkin Orange” with a couple of drops of “Chestnut” (Apple Barrel) and gave the pumpkin two coats. I always let one coat dry before I add another coat. Once the paint was dry again, I used my antic-wax around the edges. With a tissue and a small amount of antic wax, I drew the grooves to make the pumpkin look more realistic. Later, I stenciled “Happy Fall, y’all!” on the smaller pumpkin.
Before I glued the pumpkins together, I added a couple of Jenga blocks as risers. This gives the pumpkins a greater optical depth than being directly glued on top of each other. I still had a raffia bow, and I hot-glued it to the smaller pumpkin. For the tall pumpkin, I used burlap ribbons to make a lazy bow. And the new pumpkin shelf sitter is done.
🍃🍂🍁🍃🍂🍁🍃🍂🍁🍃🍂🍁🍃🍂🍁🍃🍂🍁🍃🍂🍁🍃🍂🍁🍃🍂🍁🍃🍂🍁🍃🍂🍁🍃🍂🍁
🍃🍂🍁🍃🍂🍁🍃🍂🍁🍃🍂🍁🍃🍂🍁🍃🍂🍁🍃🍂🍁🍃🍂🍁🍃🍂🍁🍃🍂🍁🍃🍂🍁🍃🍂🍁
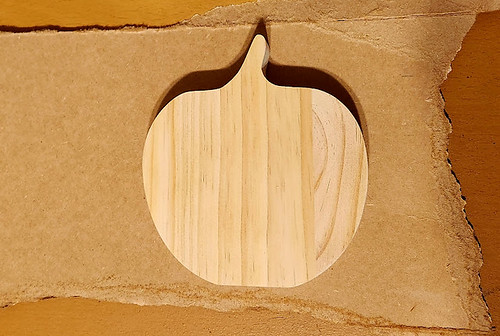
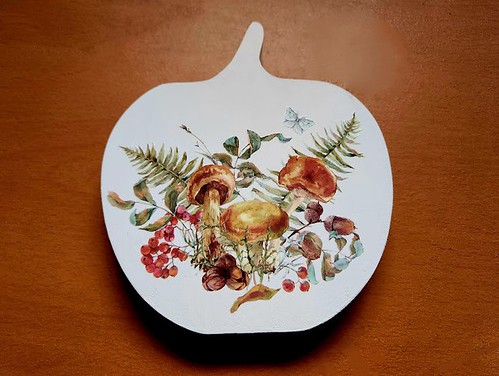
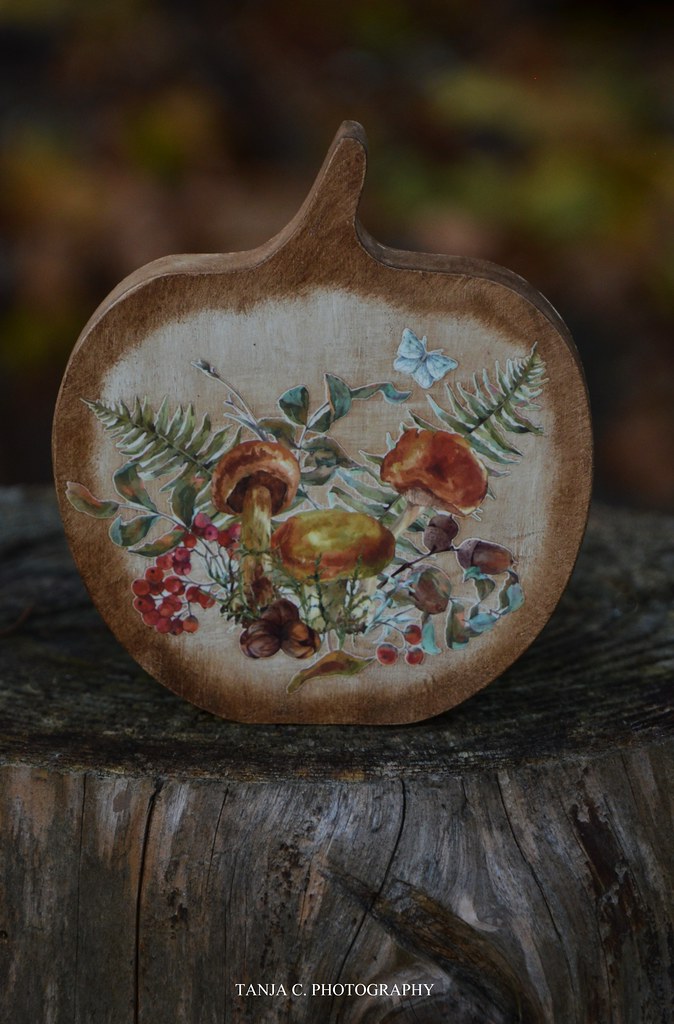
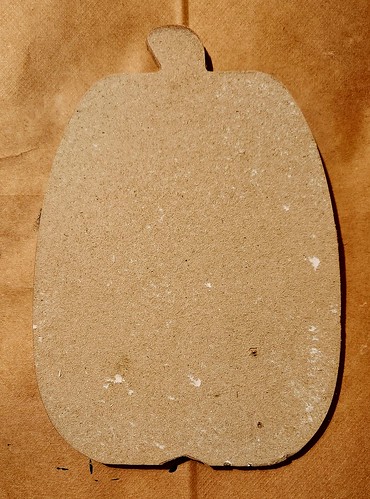
I decided to make a Woodland sign since I still had another unused pumpkin wood sign. Recently, I ordered some rub-on transfers from Amazon. And they are perfect for making signs and ornaments with them, after coloring the pumpkin wood sign completely in white chalk paint. Once the paint was dry, I rubbed on the transfer sticker. As a finish, I used antique wax to stain the sign. Now, the wax is dry. And the sign hangs on our living room wall.
🍃🍂🍁🍃🍂🍁🍃🍂🍁🍃🍂🍁🍃🍂🍁🍃🍂🍁🍃🍂🍁🍃🍂🍁🍃🍂🍁🍃🍂🍁🍃🍂🍁🍃🍂🍁